Homegrown Flower, Herb and Vegetable Transplants
Homeowners often buy vegetable, herb, and flower plants at the garden center. While vegetable and flower transplants (or starts) are convenient, they can easily cost 20 times more than growing starts from seed. In addition to saving money, when you become the plant producer, you get to decide what varieties to grow. And with mail-order catalogs and online seed companies, there are thousands of choices available. Some cultivars cannot be grown from seed and require asexual propagation (through cuttings or grafting), but the bulk of vegetables and flowers can be produced directly from seed.
Growing plants from seed typically requires a little more training and finesse than transplanting starts into the garden, and it also requires more time. But with practice and proper techniques, this is an accomplishment that many people can easily achieve. After all, humans have been successfully growing plants from seeds for thousands of years.
Materials
Trays and liners. Garden centers carry a wide selection of plug trays for starting seeds. For most transplants, a tray containing about 50 to 128 cells will be an appropriate size. Professional growers will often use trays with an even higher number of cells, but as the cell size gets smaller, the seedlings become difficult to water and maintain without careful monitoring. Most homeowners do not typically need the large quantities generated by professional growers. There are holes in the bottom of each cell within a plug tray, which allows for excess water to drain out. Trays can be placed in liners for ease of handling. Mudflats are tray liners that do not have any drainage holes, so water that drips from the plug trays is retained. If used, discard any standing water in the mudflat after watering.
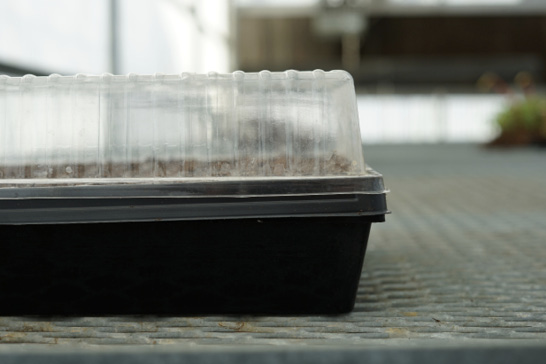
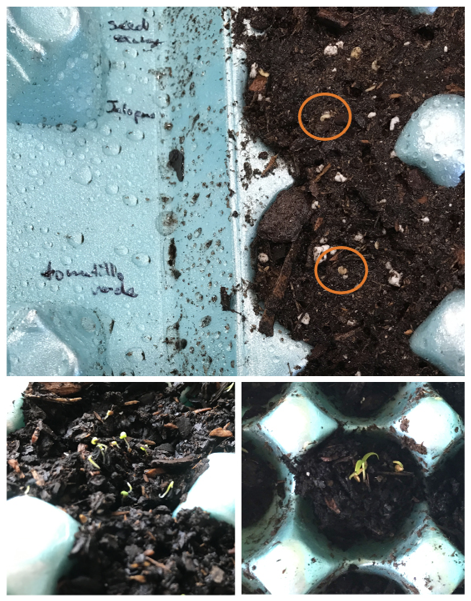
Humidity control. Seed germination is most successful in humid environments. Propagation domes are an easy way to capture humidity. These clear, rectangular, plastic covers fit over the top of the black plastic trays and help seal in water vapor (Figure 1). Once the seeds begin to germinate, remove the domes. A cheaper alternative to plug trays, propagation domes, and mudflats is to use egg cartons (Figure 2). These can be cleaned with hot, sudsy water or rubbing alcohol and filled with potting soil, and the lid can act as a built-in propagation dome to keep humidity high.
Media. Garden centers sell a wide variety of soils, media, and mulches. Only disease-free seed starting mix or potting soil (i.e., potting media) should be used for growing seeds. The term “soil” is often used out of familiarity and habit, but these are technically soilless materials. Also, be sure that the potting media does not contain added fertilizer unless it has been specifically formulated for seedlings. This is often indicated on the bag with something like “feeds up to 4 months.” The fertilizer rates can be too high, damaging some seedlings, unless it is specifically formulated for seedlings.
There are also compressed disks of peat moss surrounded by a mesh pouch that expands when they are watered. They are often sold individually, making them easier to handle than dealing with large bags of potting media, and they reduce waste for gardeners who just want to grow a few transplants. They are most easily stabilized by placing them in a plug tray. It is not recommended to use regular garden soil in pots. It often contains plant pathogens, insect eggs, and weed seeds, and may not provide adequate drainage for good seedling growth.
Seeds. Choosing seeds can be a fun but daunting task. There are many reputable seed companies, co-ops, garden centers, hardware stores, grocery stores, and dollar stores that sell seeds. Some seeds are higher quality than others, and some companies package and store their seeds better than others. Price is not always indicative of the quality, so feel free to experiment. You may find that some companies sell seeds that do not germinate well, are mislabeled, or have diseases.
Some companies specialize in heirloom varieties and organic seeds; others specialize in varieties that are disease-resistant and high-yielding, while others will specialize in having unusual or new varieties. Some companies advertise that they only sell non-GMO (not genetically modified) seeds, but this is largely a marketing tactic, since nearly all companies that sell to the public only sell non-GMO seeds. GMO seeds have to be purchased from a farm-based seed dealer and require licensing and signing a contract.
Companies may also coat some seeds with a fungicide or pesticide. They are added to prevent diseases in seedlings, such as wet molds or dampening off. Treated seeds are labeled with a warning sticker. Proper protective equipment, such as latex or nitrile gloves, should always be used when handling this seed, and hands should be washed afterward. Dyes are added to the pesticide to make it highly visible. Often these treated seeds will be bright orange, green, or blue (Figure 3). Be sure to follow the label and any warnings provided with the seed. Small seeds are sometimes coated with a polysaccharide to make them easier to handle. This coating will be dissolved with water after they have been sown.
For the best chance of success, Mississippi gardeners should purchase varieties that are labeled as having excellent disease resistance, because fungal pathogens thrive in our warm, humid, and wet environment. Also, look for varieties that are labeled as being heat-tolerant or slow-bolting. As your own production manager, you can choose what is appealing or important to you. You may want to experiment with new cultivars or uncommon vegetables or flowers. Keeping a gardening journal will help document what works and what doesn’t.
Sowing Seeds
To begin, fill the tray or egg carton with potting media, being sure to break up any large clumps and remove any twigs or other plant material. If the medium is really dry, it becomes hydrophobic (repels water). Therefore, it can take time for it to absorb water and become hydrated. Once hydrated, the medium acts like a sponge and wicks up water. The medium should be moist but not overly saturated. The medium is easy to work with when enough water has been added that it will hold a shape when firmly pressed together but fall apart when gently disturbed. If excessively wet, the media will create an environment for diseases that will damage or kill seedlings.
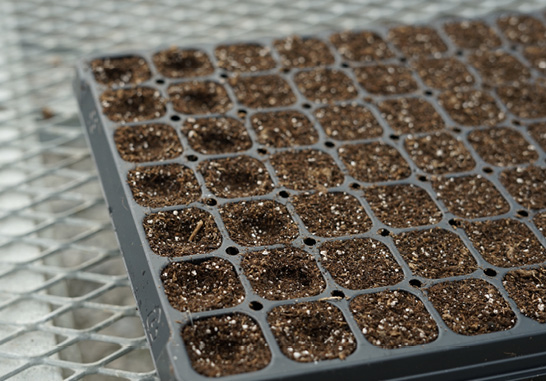
Lightly pack and smooth the potting medium. If the seeds require being covered or planted below the soil surface (this information is usually provided on the seed packet), create an indentation with your finger, a pencil, or something comparable and place at least one seed on top of the indentation (Figure 4). Gently cover the seeds with extra potting medium or coarse vermiculite (Figure 3). Label the seeds with stick tags. If using an egg carton, variety names can be written directly inside or outside the lid to the corresponding cell (Figure 2).
Lightly water in the seeds. This is most easily done with a 1,000-hole water breaker attached to a hose. Alternatively, you can use spray bottles or a slow trickle from a hose or spout. Too much water pressure can wash seeds and growing media out of the cells. Again, be careful not to overwater. For polysaccharide-coated seeds, be sure to break down the seed coat during this initial watering. Place the germination dome onto the tray or close the egg carton lid, and place it in a brightly lit room out of direct sunlight. If the weather is warm enough, place the tray or carton outside out of direct sunlight, and bring it inside if temperatures drop below 55°F.
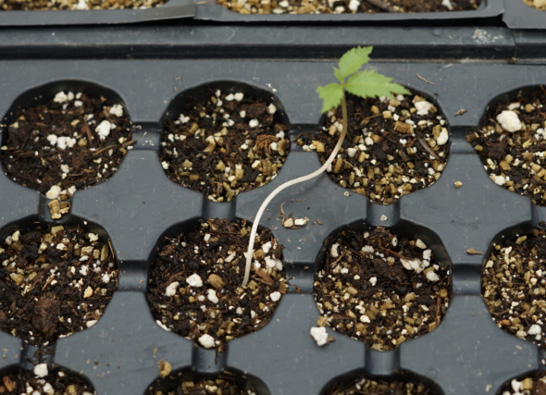
Most seeds will germinate between 3 and 10 days; this information is usually provided on the back of the seed packet. If possible, check them twice per day and carefully water the cells that are getting dry, but do not wait until they are totally dry before watering. The radicle (the first root to emerge) will soon protrude out from the seed. At this point, the domes can be partially or entirely removed during the day and put on at night; for the egg carton, leave the lid open during the day. During this time, it is important to put them in a bright location where they can get full sun for at least part of the day. Mississippi weather during the later winter/early spring is usually amenable for placing the trays outside during the day and bringing in at night. Seedlings that do not get enough sun are long, stringy, and often fall over (Figure 5).
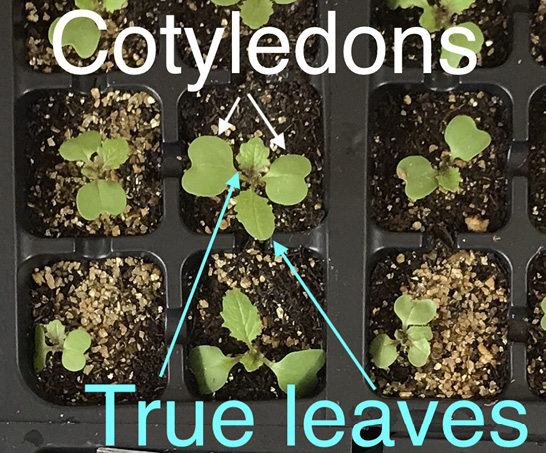
Within a few days, the cotyledons (the first set of leaves) will develop, followed by the first set of true leaves (Figure 6). At this point, diluted fertilizer (around 25 to 50 ppm nitrogen) can be used to help promote healthy growth; however, if the potting media has fertilizer formulated for seedlings, do not add fertilizer. Also, if multiple seedlings are growing in a single cell, the weaker ones should be removed by cutting them off near the base of the soil. Removing them by pulling them out can damage the seedling you want to save.
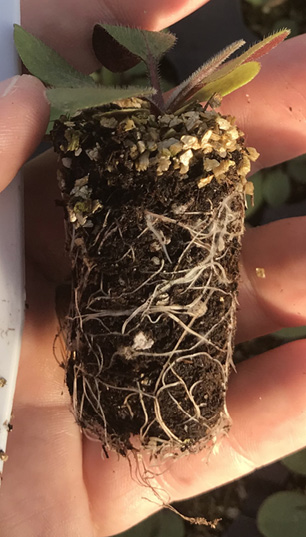
From here, the seedlings will continue to grow, and the seed domes or lids can be left off all the time. Fertilizer rates can be increased to around 75 to 125 ppm. The leaves have sufficient fertilizer when they are a healthy green color. Light green leaves indicate the plant is lacking nitrogen. Once they develop three to five sets of true leaves, they may need to be transplanted into the garden or a larger container. You will know they are ready when you can easily remove the plug from the tray without the root ball falling apart (Figure 7). Be sure not to let them grow so long that the root ball becomes overgrown and tightly packed.
If seedlings are grown exclusively inside, they will need to be hardened off before they are transplanted outside. This requires about two weeks. Simply place the tray outside in a sunny location for a few hours a day, and gradually extend the time they are outside each day. If temperatures drop below 45°F, it is a good idea to bring warm-weather plants inside.
Seed Storage
Many seeds will last for years or even decades under proper storage. This saves money and means you can save unused seeds for another season. However, Mississippi’s climate is brutal for seed longevity because high temperatures and humidity are detrimental for seed storage.
For proper storage, select a container with an air-tight seal, such as a mason jar with a tight lid or a plastic food-storage container with an air-tight rubber gasket. Simply place the seeds inside, close the container, and store it in the refrigerator. You can also store them in the freezer, but there is not much gain in seed longevity, and freezing and thawing can damage some seeds.
Some seeds do not last as long as others in storage, but you can check the seed viability by taking 10 to 20 seeds from a packet and placing them on a moist paper towel. Fold it in half and seal it in a plastic bag. Keep it out of direct sunlight for one to two weeks, and check them every couple of days for signs of germination. Keep the paper towels moist but not overly wet. Divide the number of seeds that germinate by the total number of seeds tested to calculate the germination rate.
Seeds that sprout during the germination test do not need to be discarded. They can be very gently moved to a plug tray filled with potting media and will likely survive if the tissue is not smashed, pinched, or bruised during the transfer. Seeds with poor germination should be either heavily overseeded or thrown out.

Publication 3436 (POD-04-20)
By Shaun Broderick, PhD, Associate Extension/Research Professor, Truck Crops Branch Experiment Station.
The Mississippi State University Extension Service is working to ensure all web content is accessible to all users. If you need assistance accessing any of our content, please email the webteam or call 662-325-2262.


